• HOME
  • FOOD
  • TRAVEL
  • ABOUT
  • Menu

COOKING WITH THE PAN

sharing food inspired by my background, travels, and places I've called home
  • HOME
  • FOOD
  • TRAVEL
  • ABOUT

Winter Adventures and Maple Blueberry Muffins

March 09, 2025

March 9, 2025

Winter in New England this year has been brutal. We’ve had multiple weeks of frigid temperatures and snowy days. While I mostly enjoy the snowfall, the most difficult part has been the effect of the cold temp on my working hands. No matter how much lotion I lather on, it never seems to be enough to keep my hands from cracking. That aside, Z has been absolutely loving the snow days. She would often eagerly await the snowfall just to play outside. On snow days, I can see her eyes light up when she sees piles upon piles of snow outside the window. The moment she steps foot outdoors, she doesn’t want to come back inside. I’ve deeply appreciated all of the precious moments I’ve been able to experience watching her find joy in winter weather. In between shuttling her to and from school and going to work myself, I’ve been working on another recipe to share on my site that features two ingredients unique to New England. The first ingredient is wild blueberries. I’m using the frozen kind from Wyman’s since I can more easily get them at the local Market Basket and Stop & Shop. The second ingredient is maple syrup that I’ve had the pleasure of getting in person at Ben’s Sugar Shack up in New Hampshire. These ingredients are featured in my recipe for maple blueberry muffins. While experimenting with the ratio of ingredients for my maple blueberry muffins, I found that just adding maple syrup is not enough to give the muffins the distinctive maple flavor and aroma. I definitely needed to add a couple teaspoons of maple extract to help the maple flavor shine in these muffins. Once I made that breakthrough, I was able to produce muffins with a lovely maple flavor. Most muffin recipes ask for cupcake liners to be filled halfway or three-quarter way full, but for these muffins, I like to fill the cupcake liners to the very top. This way, once baked, the muffins spill over and end up with the look of true muffins. Another trick I learned during my experiments is the importance of using a mixture of mashed and whole blueberries. Mashing the blueberries helps to give the muffins a stronger and more prevalent blueberry flavor. For this recipe, I used a combination of mashed fresh blueberries and frozen wild blueberries. Just a note on Wyman’s wild blueberries: I started incorporating these blueberries into my baked goods when I discovered them at a local Stop & Shop shortly after moving to Massachusetts. These frozen wild blueberries tend to be smaller and have a much more intense blueberry flavor than standard blueberries. I’ve used them extensively when making my wild blueberry whoopie pies and like to incorporate them into baked goods that ask for blueberries. Not only do these muffins have an intense blueberry flavor that honor the flavor profile of blueberry muffins, but the maple flavor also shines through with the addition of both the syrup and extract. I’ll admit that even before moving to New England, I loved using maple syrup in pretty much everything I make. Maple syrup has a clean sweet flavor and works beautifully as a sweetener for sauces, dips, and milk tea. Since moving to Massachusetts, I find myself adding maple syrup to pretty much everything. Once a year, during Maple Weekends here in New England, I travel up north to stock up on maple syrup. When March rolled around this year, we drove up north again to stock up on maple products from Ben’s Sugar Shack. Ben’s Sugar Shack is a well-known local producer of maple syrup located in New Hampshire and has become our go-to shop for maple syrup. Earlier this month, we got a refresher on how maple syrup is produced, enjoyed some samples of maple products, and stocked up on a few bottles of maple syrup all from Ben’s. Aside from just maple syrup, Ben’s also carries maple-flavored snacks. Kev usually heads for the snack section to get his fix of maple leaf crème cookies while my snack of choice is Cabot’s maple cheddar popcorn, a nod to New England that reminds me so much of Garett’s popcorn in Chicago (I even recreated them here). Though, that’s a story for another time. Once we loaded up on maple syrup (and an assorted array of maple-flavored treats) for the year, I got right back to work to make a batch of my maple blueberry muffins, the perfect little treat for breakfast, brunch, and snack on weekdays. As you can see in the photos above, Z is absolutely fascinated by the production of maple syrup. It also doesn’t hurt that the maple syrup treats are so addictive. When I started making maple blueberry muffins, she kept coming back for more and more. She often asks for them in the morning every few days. Luckily for us, during recipe development and testing, we all benefit from having large batches of muffins baked up and ready to go on those mornings where no one can be bothered to make breakfast. These maple blueberry muffins do the trick of filling our grumbling bellies and holding us over until lunch time.

Read More
Tags: sweet, breakfast, brunch, snack
Comment

Summer and Fall Adventures and Cinnamon Roll Scones

October 27, 2024

October 27, 2024

As summer comes to an end here in New England, we’ve been slowly adjusting back to the pace of a new school year. We’ve had a fairly packed summer with Z including weekend trips to Crane Beach, fruit picking at local farms, visits to museums and historic homes in nearby states, and a trip to a sunflower field packed with towering blooms. When September rolled around, Z started attending school full-time on weekdays, which meant cooking and baking a little bit more on weekends to ensure she has food the next day for lunch. Her school lunches typically feature a range of foods from each food group. Packing lunches for Z also gave me a reason to get back to recipe development mode more consistently. One recipe I’ve been working on over the last couple of months is a twist on cinnamon rolls and scones. Whenever fall arrives, I always look forward to the flavors of warming spices, most notably cinnamon and nutmeg. Cinnamon and nutmeg seem to make their way into most baked treats and drinks I crave during these cooler months. A baked treat I find myself craving often during the fall is cinnamon rolls. I’ve loved the flavors of cinnamon rolls ever since childhood and wanted to find a way to repurpose these classic morning treats into another treat. My experiments led me to the creation of cinnamon roll scones or cinnascones. Essentially, my cinnamon roll scones combine my love for both treats into one. This recipe has all the flavors of a cinnamon roll in the time it takes to make scones. Honestly though, it does take slightly longer to make cinnamon roll scones compared to typical scones because of the added component of the cinnamon-sugar-butter filling that is rolled into the cinnamon roll scones. I usually make the filling or paste ahead of time and leave it to cool as I start the next step of prepping the dough for the scones. One benefit of these cinnamon rolls is that they are less sweet than your traditional cinnamon rolls. When developing this recipe, I played around with the ratio of ingredients in my go-to scone recipe to get the proportions just right. Because of the added filling in the center of the scones, I had to reduce the amount of liquid I typically use to make scones. This prevents the scones from spreading too much when baking. The rest of the ingredients included in the scones are your usual ingredients—all-purpose flour, baking powder, baking soda, butter, sugar, salt, and milk. These cinnamon roll scones do include the addition of both vanilla and almond extract and both ground cinnamon and nutmeg. The additional extracts and spices work well together to create a symphony of complementary flavors. The combination of these flavors is what makes the cinnamon roll scones truly stand out. While testing and retesting this recipe at home in preparation for sharing on my site, Kev, Z, and I have benefited from enjoying multiple iterations of these cinnamon roll scones. We had some for breakfast, some throughout the day as snacks, and even some for dessert on occasions. These cinnamon roll scones have even made their way into Z’s bento box lunches a couple times. They store well in the fridge and have added a little bit of a fall touch to our days. Whenever I find my cravings kicking in, I turn to these cinnamon roll scones and a cup of drip coffee for a relaxing morning breakfast treat.

Read More
Tags: sweet, snack, breakfast, brunch
Comment

Spring Celebrations and Wild Blueberry Whoopie Pies

June 23, 2024

June 23, 2024

Summer has finally arrived in New England. The transition from spring to summer brought us windy temps on some days and heat waves on others. The last couple of months have been especially exciting for our family as we traveled extensively throughout the New England area. Just this month, we headed up north to visit friends in Maine. A couple of months ago, in April, we made a special trip up north to New Hampshire and Vermont to witness the April 8th solar eclipse. In May, we headed west to visit some of the hidden gems located throughout the Berkshires. In between these trips, we celebrated our birthdays during the month of May. Since all three of our birthdays land in the month of May, we pretty much celebrated a birthday every week throughout the month of May. For Z’s birthday, we celebrated with an I Love You to The Moon and Back book theme. In between work and travels, I’ve been working on developing new recipes to share on my site. One recipe I’ve been working on lately has been my take on a classic New England treat I’ve had on multiple occasions on my trips up north. These treats are of course the cookie-shaped, cream-filled cakes known as whoopie pies. Despite the name, whoopie pies aren’t pies but are actually cakes shaped like giant cookies with cream sandwiched in between. They look pretty much like ginormous Oreo cookies. The ones here in New England are typically chocolate cakes with a marshmallow cream in the center. I find myself gravitating to these dessert pies every time I make a trip up north to Maine. On nearly every trip, we’ve defaulted to having lobster rolls and/or lobster bisque for lunch and rounded out the meal with whoopies pies for dessert. The whoopie pies I’ve eaten on my trips to Maine are always amazing. They are such beloved desserts that there are bakeries dedicated specifically to them. The taste reminds me of some of the packaged chocolate cream-filled snack cakes I would buy from the local grocery stores in Brooklyn throughout my childhood. When I set out to recreate these lovely little snack cakes, I wanted to combine a classic chocolate whoopie pie with the de facto Maine fruit, wild blueberries. Fresh wild blueberries aren’t easy to find where we live, but frozen wild blueberries are easily found in the freezer section of the local Stop & Shop near us. Since chocolate pairs beautifully with blueberries, it was only natural for me to combine my love for chocolate and blueberries into wild blueberry whoopie pies. My version of whoopie pies is a nod to the classic treat and the classic fruit of Maine. The best part about these whoopie pies is the portability. They are easy to tote around as a dessert after a meal, and they make for the perfect little celebration cakes for Z. The slight tartness of the wild blueberries helps to balance out the sweetness of the whoopie pies. Depending on where you get whoopie pies, the cake to filling ratio can vary drastically. Some whoopie pies are filled to the brim with filling, while others are not so much. When I recreated these treats, I tried to keep the ratio of cake to filling somewhere in the middle. Since these cakes are celebration cakes for Z, we wanted to make sure she got a full-size whoopie pie to herself. Z became a fan of these chocolatey treats ever since she set her little teeth on her first whoopie pie on our travels to Maine. When Z turned two last month, I baked up a batch of wild blueberry whoopie pies just for her to enjoy as birthday treats. We wanted her birthday theme this year to be a logical transition from last year’s birthday theme based on the book, The Wonderful Things You Will Be. With our recent travels to see the solar eclipse, I felt inspired to create a moon-themed birthday celebration. The logical choice was another one of Z’s favorite children’s book, I Love You to the Moon and Back. We obviously replaced “to” with “2” to keep with the 2nd birthday theme. As you can see in the photos throughout this post, Z thoroughly enjoyed her share of the wild blueberry whoopie pies on her birthday. She even asked for more of these little chocolate cakes on the days after her birthday.

Read More
Tags: sweet
1 Comment

Winter Travels and Smoky Cheddar Heart Crackers

March 10, 2024

March 10, 2024

February has been an exciting month of holiday celebrations for us. This year, Lunar New Year landed in the month of February, and so we traveled back to Brooklyn, New York to celebrate with family and friends. Right after Lunar New Year, we celebrated Valentine’s Day with Z at home. Z had quite the haul from both holidays. She received a stack of red envelopes from our family for Lunar New Year and then another stack of Valentine’s Day cards and toys from her classmates. Shortly after the February holiday celebrations, we took another short trip up north to see the Ice Castles in the heart of New Hampshire. Z marveled at the icy tunnels and structures and made her way through the icy walkways. Aside from all the February fun, I’ve been making smoky cheddar heart crackers throughout the month, testing and retesting my recipe. These snack crackers are very loosely inspired by my love of Cheez-It growing up. My version of the addictive cheddar crackers is made with super simple ingredients and are the perfect snack to pack for long (or short) car rides. With Z now more mobile than ever, we often find ourselves packing a lot of books, toys, and snacks to keep her occupied on road trips. These smoky cheddar crackers do the trick of helping satisfy her hunger and keeping her occupied at the same time. When making these cheese crackers, I like to use a fun scalloped heart-shaped cookie cutter to cut these crackers out as the fun heart shape makes them appealing to Z. I’ve packed these smoky cheddar crackers on multiple car rides with Z from short trips to much longer road trips. Z snacked on a handful of these crackers throughout our trip to New Hampshire and during snack time in the mornings and afternoons at home with grandma. The best part is I could whip these up in no time and keep them in the refrigerator for a few days. Not only are these crackers toddler-friendly, they are also adult-friendly. Whenever my cravings for savory snacks kick in, I could easily grab a handful of these snack crackers to enjoy as either a mid-morning snack or a late afternoon snack. To make these smoky cheddar heart crackers, I pulse together all-purpose flour, salt, sugar, smoked paprika, freshly cracked black pepper, butter, grated sharp cheddar cheese, and a couple tablespoons of cold water. The cold water works to bind everything together. The process I use for making these smoky cheddar crackers is similar to the process I use for making pie dough. Essentially, I drop all the ingredients into the food processor and let the food processor do its job to bring everything together. I then roll out the dough as thin as possible and chill the dough in the refrigerator for at least an hour before cutting out the heart-shaped snack crackers. Right before I pop them into the oven for baking, I artfully arrange the heart-shaped crackers on a parchment-lined baking sheet. About 18 minutes later, I end up with the perfect snack crackers. I have even left the crackers in the oven for a smidge longer (about 3-5 minutes) on a couple of tries to yield a toastier version of the cheddar crackers. As an optional step, I top these snack crackers with a pinch of Maldon salt just before serving. I love making these crackers on weekends when the weather outside turns chilly. This month has brought us multiple cold and somewhat snowy weekends. These snack crackers kept my cravings (and my family’s cravings) at bay throughout the mostly chilly February month.

Read More
Tags: savory, snack
Comment

Barbecue Chicken Bo Lo Bao and Adventures with Z

December 17, 2023

December 17, 2023

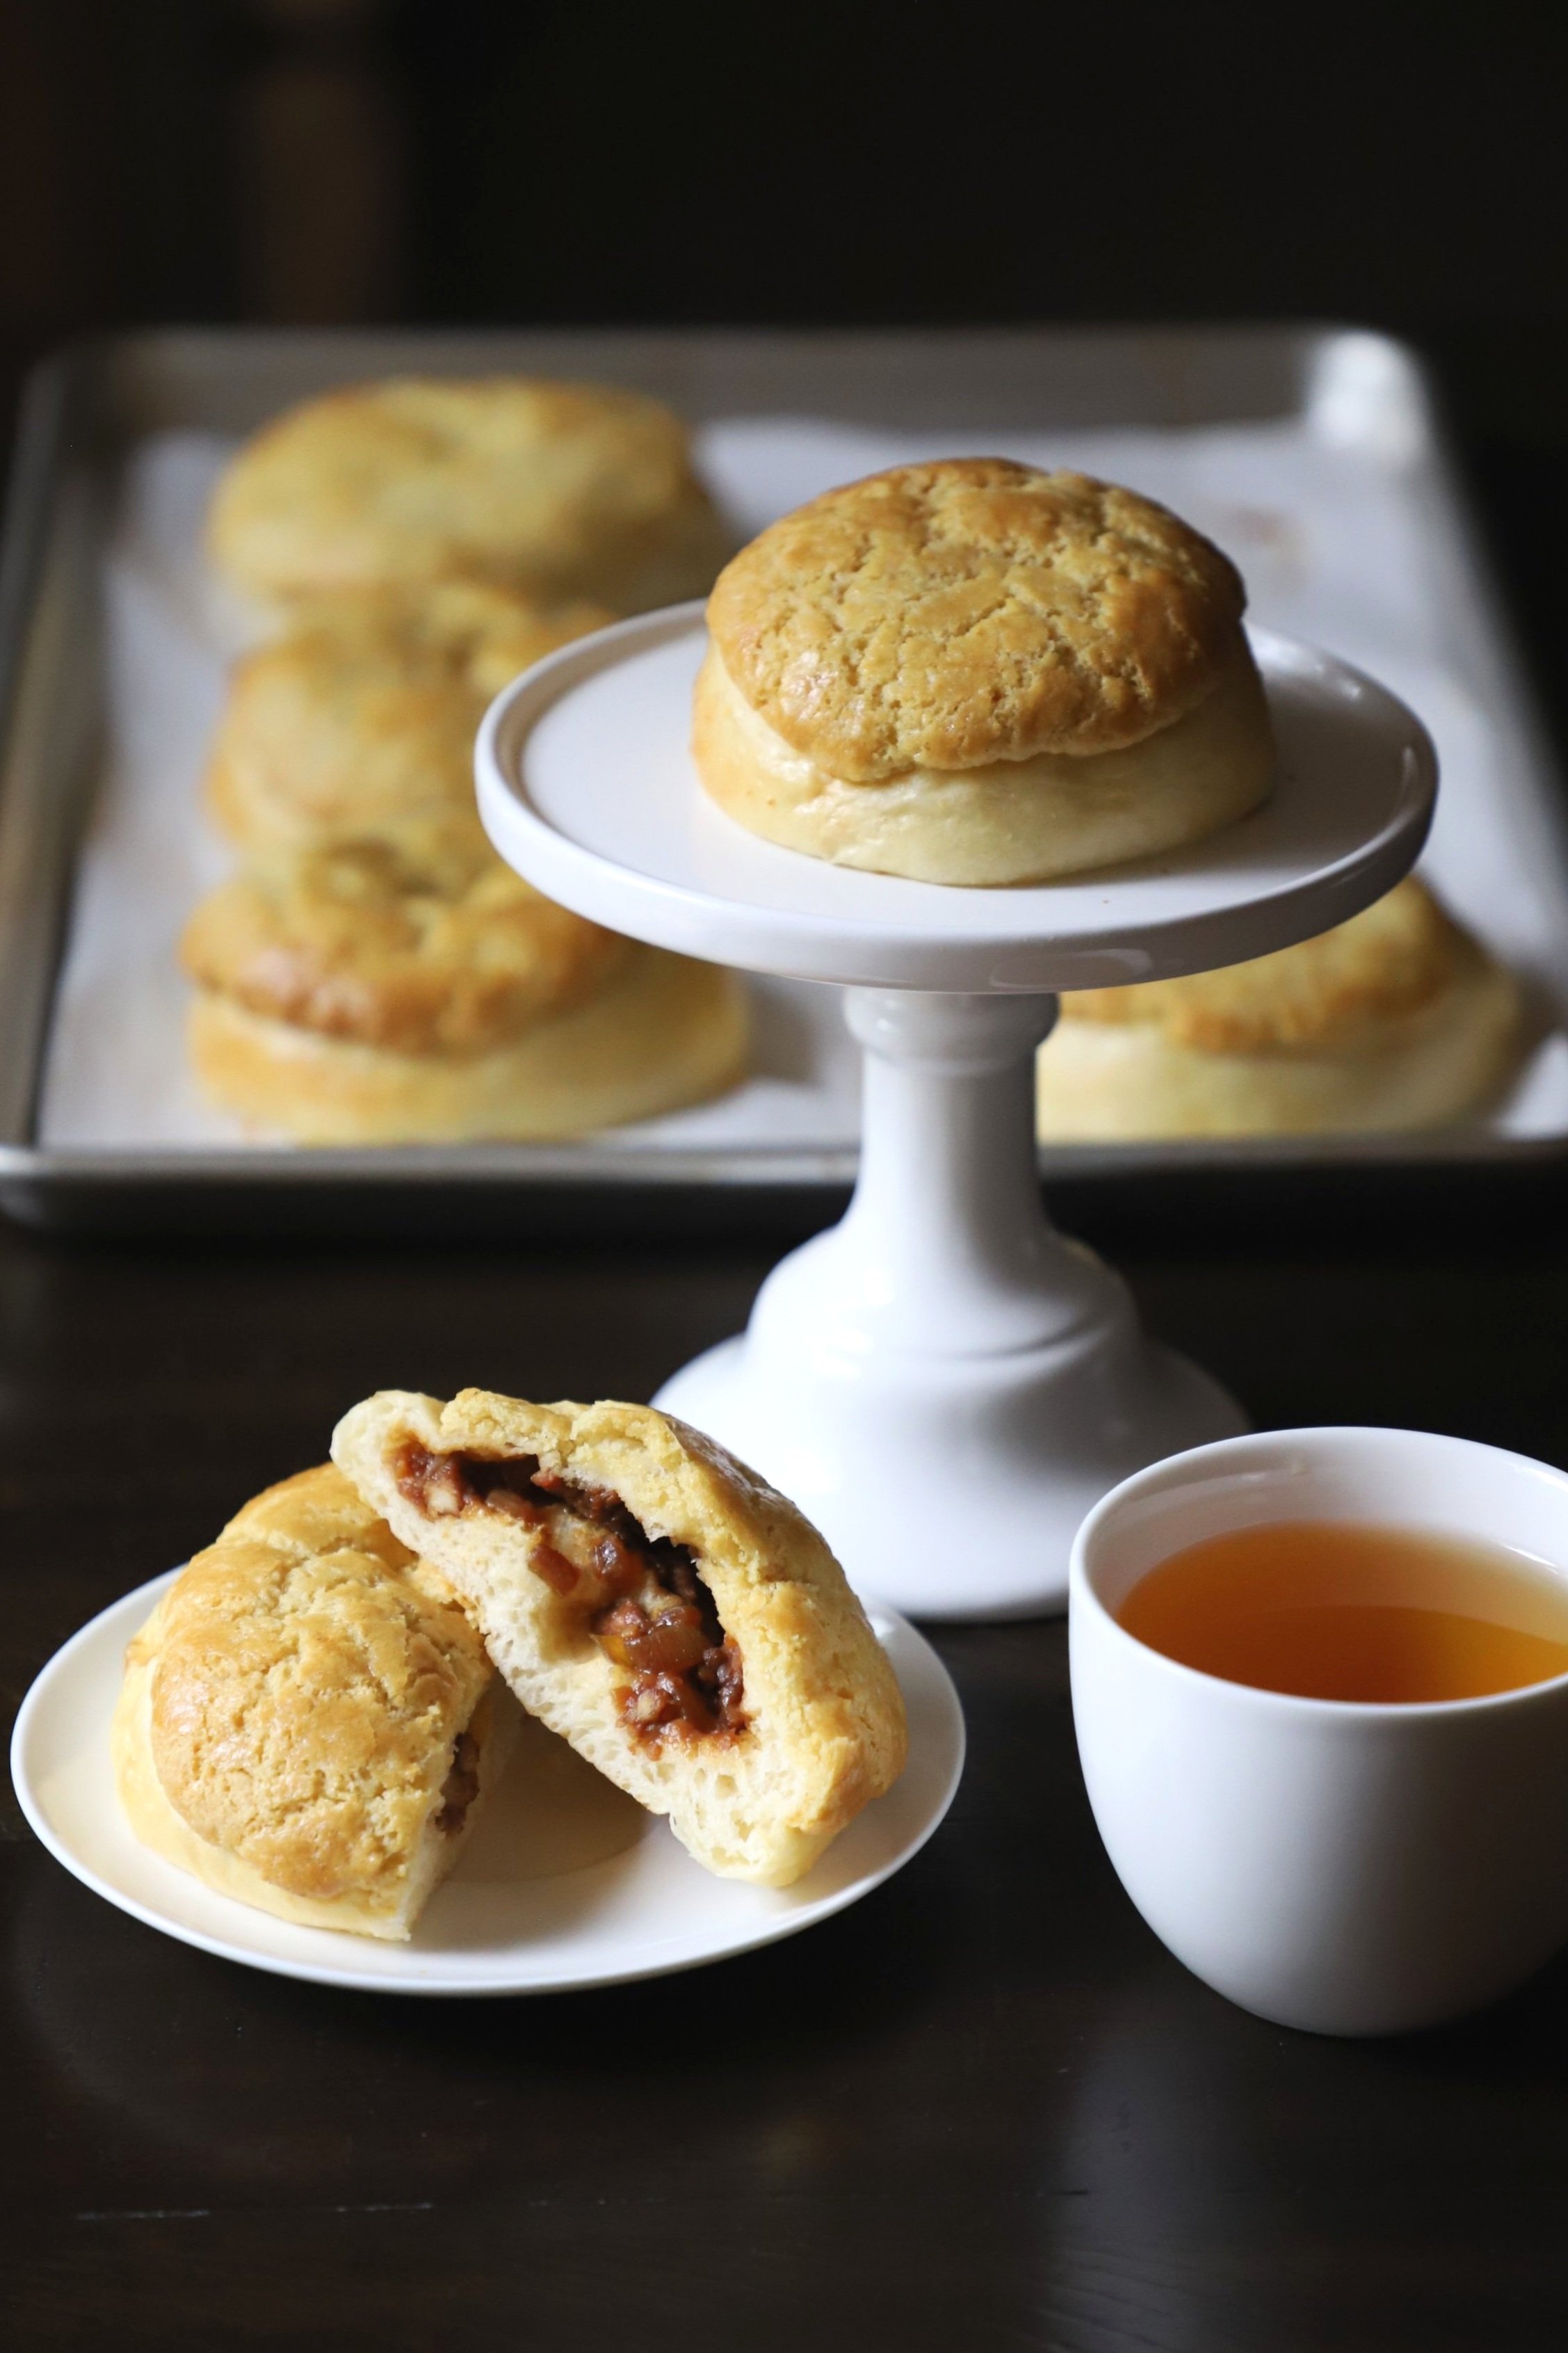
Winter in New England is truly a wonderful experience. The temperature has steadily dropped as well, which means out comes the winter hats, gloves, scarves, thick sweaters, and cozy socks. The transition to winter is an exciting time in New England since there is just so much to do not just in Massachusetts but also in the neighboring states. Over the last couple of months, Z has grown into such an energetic toddler. To help expend some of her energy, we’ve been taking her to a ton of local events in the neighboring states. Aside from all these adventures with Z, I’ve been actively working to develop more recipes to share on my site. A few months ago, when I was developing my recipe for egg tarts with a twist, I was simultaneously working on a recipe for my take on bo lo bao (or pineapple bun). Pineapple bun is a beloved bakery item that I grew up eating in Brooklyn. Contrary to the name, there is no pineapple in the bun (although, I have seen some bakeries incorporate pineapple into the actual buns). The name comes from the golden yellow cookie topping that is perfectly positioned at the top of a fluffy milky bun. The cookie topping forms a crack while baking in the oven. Once baked, the cookie topping resembles the appearance of a pineapple or bo lo. I wanted to combine my family’s love for bo lo bao with another family favorite, char siu bao, and ended up creating a barbecue chicken bo lo bao. My barbecue chicken bo lo bao is essentially a twist on a twist of two classic Chinese bakery buns combined into one. I grew to love bo lo bao mainly because my dad loves it. He would buy bo lo baos at the local Chinese bakeries near my childhood home in Brooklyn for breakfast, lunch, and even dinner at times. His love for bo lo bao spilled over to my brothers and I, and we often find ourselves craving bo lo bao whenever we walked by a Chinese bakery. Kevin, on the other hand, grew up in Hong Kong and has had his fair share of bo lo baos throughout his time living there. He remembers fondly the features of truly delectable bo lo baos especially when they are freshly baked and eaten straight out of the oven. For both of us, the hallmark of an excellent bo lo bao is the balance of a fluffy milky bread base and a crunchy cookie topping baked to golden perfection. A bo lo bao isn’t a bo lo bao unless there is a golden yellow cookie topping resembling the appearance of a pineapple positioned perfectly on top of the fluffy bread. Bo lo baos are best enjoyed when they are still warm out of the oven with the crunchy cookie topping intact. When I set out to recreate the bo lo bao, I thought back to my memories of the perfect bo lo bao before diving into research to recreate a version as close as possible to the ones I ate throughout my childhood. One bread baking technique that is often used in Chinese bakeries is tangzhong (or water roux). Essentially, you precook a portion of the liquid and flour to create a roux and then fold the roux directly into the bread dough during mixing. The addition of the tangzhong is what contributes to the ultra-fluffy, super soft bread texture. Tangzhong is often used in milk breads to help them achieve the signature fluffy texture. The tangzhong combined with letting the dough sufficiently rest is what results in the ideal pillowy texture of the bread. Ever since I incorporated tangzhong into bread baking, it has become such a game changer. Time after time, batch after batch, the bread always turns out ultra pillowy and soft. I’ve started to incorporate tangzhong into baking as often as possible whenever I want a reliably fluffy bread. On colder days, all I want to do is to bake up batches of these delicious bo lo baos to serve alongside some milk tea. For me, there is nothing more relaxing on a cold weekend than enjoying a bo lo bao straight out of the oven with a cup of steaming hot milk tea.

Read More
Tags: sweet
Comment

Egg Tarts with A Twist and Summer Adventures with Z

September 04, 2023

September 3, 2023

Happy summer! It has been a while since I last posted. I’ve been spending all of my time outside of work planning fun family activities to keep Z occupied throughout the summer. She has reached the stage where she has tons of energy and needs to expend the energy daily. We’ve had a couple of beach days, seen some family-friendly shows, strolled through historic homes in New England, visited museums throughout Massachusetts, and even had our first semi-long family road trip to Bar Harbor. When we aren’t out and about as a family, I’ve been testing out new recipes and refining upcoming recipes to share on my site. One recipe I have been working on and am finally ready to share is my take on Portuguese-style egg tarts, inspired by the famous egg tarts sold throughout Macau and Hong Kong. These egg tarts are also a favorite dim sum dish of ours. Dim sum is a dining ritual we’ve had in our family since childhood. I still remember fondly all the moments during my childhood where I would go to dim sum with my family and order all my favorite dishes. I would always go for the shrimp dishes (usually har cheung or har gow) and finish with a sweet treat during dim sum. The sweet treat of choice ranged from ma lai go to sesame ball with red bean paste to egg tarts. Egg tarts are truly amazing when enjoyed straight out of the oven. As much as I love the traditional egg tarts, I also love the Portuguese-style egg tarts. Portuguese-style egg tarts differ from traditional egg tarts in some fundamental ways. Portuguese-style egg tarts tend to have a puff pastry crust and an egg custard made with egg yolks baked at a high temperature to yield toasty brown spots. I love eating these egg tarts whenever I’m in Hong Kong or Macau. They’re one of my favorite dim sum treats to enjoy toward the end of the meal when I want something sweet to balance out the savory dim sum dishes. During the first few years when Kev and I dated, we vacationed in Macau and had the opportunity to enjoy freshly baked Portuguese-style egg tarts. The experience of biting into a piping hot egg tart straight out of the oven is a truly decadent experience. For a moment, all the world seems to fade away as I bite into the buttery, flaky crust before my teeth sinks into the silky, smooth egg custard filling. I would describe the Portuguese-style egg tart as a fun cousin to the traditional egg tart. With my parents staying with us in Massachusetts for the time being, we’ve jump started our dim sum ritual once again. Every other weekend, we would head over to Ming’s Seafood Restaurant in Malden to get our fix of dim sum. My mom’s go-to dim sum dishes are always beef tripe and chicken feet. My dad opts for the lo mai gai (glutinous rice and filling wrapped in lotus leaves) and sesame ball filled with red bean paste. Although Kev usually goes for xiao long bao, he hasn’t found a worthy substitute near us. So, he just eats whatever we order for the table. I go with my usual har cheung and har gow and occasional egg tart. Since I started making egg tarts at home myself, we’ve been ordering egg tarts a lot less frequently during dim sum. Egg tarts are composed of two parts – the flaky shell or crust and the egg custard filling. For the shell or crust, I like to make a more decadent version of my shortcrust pastry dough, essentially the dough I use for all my pies. Egg tarts also require special tart tins, so I ordered a set just to make them. It’s worth it to order a set of these tins if you make tarts a lot like we do in our home. Whenever I crave egg tarts, I just whip up the shortcrust dough in my food processor and shape the dough right away in the mini tart baking tins. I then transfer the tins to the refrigerator to let the dough chill in the tins for about twenty minutes. As the dough is chilling in the refrigerator, I move onto making the egg custard filling, which is composed of just four ingredients – egg yolks, granulated sugar, whole milk, and heavy cream. A fifth, but totally optional ingredient is vanilla bean paste, which I sometimes add to the egg tarts to give them another fragrant flavor. I whisk these ingredients together thoroughly and then strain them through a sieve a couple times to remove air bubbles. Straining the egg custard filling helps ensure a smoother egg custard filling in the egg tarts. I pour the prepared filling into the shortcrust dough filled tins and bake the tarts in the oven for 20-23 minutes at 425°F. Once the egg tarts have baked for twenty minutes, I check on them and see if they need a smidge more baking time. I always check for brown spots on the egg tarts as a sign that the egg tarts are well on their way to being done. The egg tarts do need to cool for a bit straight out of the oven before enjoying. Otherwise, you will end up with a burned mouth. For a coconut twist on the egg tarts, I folded in a half cup of coconut flakes into half of the shortcrust dough before filling the tins with the dough. These egg tarts with a twist are perfect for a weekend brunch, afternoon tea, or dim sum at home. My parents, who are usually traditionalists when it comes to dim sum dishes, voiced how much they liked the coconut twist on egg tarts. We even packed leftover egg tarts to enjoy during our family trip to the beach.

Read More
Tags: sweet
Comment

Dragon Fruit Strawberry Cupcakes and Z’s First Birthday

May 29, 2023

May 29, 2023

Z has officially reached a new milestone this month. She turned one year old and has been walking with some assistance. For such a momentous occasion for Kev and I, we had to celebrate in a special way. I thought back to all our adventures with Z throughout the year and still cannot believe how quickly time has flown by. The early days were much longer than we would like, but watching Z grow from day to day has brought us so much joy. I remember exactly a year ago in May when we brought Z home from the hospital. She was a tiny baby weighing just over six pounds. The early days were the most challenging days. We operated on very little sleep and had to return to work fairly quickly. Kev had two months to bond with Z. I had slightly less. Luckily for us, aside from some challenges with sleeping through the night, Z cooperated with us for the most part. She ate pretty much anything we offered and reached all her milestones at the predicted times. Watching Z grow from a tiny baby to a tiny human has been an absolute joy. When I look at her today, I still cannot believe the tiny human half my height was only born a year ago. As her birthday approached this year, I had to think of a special way to celebrate. I did some googling and brainstorming for inspiration. Though there were a lot of ideas out there on the internet, I wanted to do something unique for Z. I wanted to center her birthday celebration on a children’s book theme. When I came across The Wonderful Things You Will Be book sitting on her bookshelf, the idea for her birthday celebration was born. Wonderful became onederful or 1derful of course. With the theme decided, I shifted my focus to the desserts. Growing up in our household, desserts tend to be on the simpler side. We usually had a sponge cake with cream and fresh fruit that my parents bought from a local bakery and a plate of fruits. I wanted to apply the same tradition to Z’s birthday and merged a celebratory treat with a realistic baby-friendly sweet. Z would get a variety of fruits, while we would get to enjoy the baked treats. Z ended up with a fruit plate. We ended up with cupcakes and cake pops. Z’s cupcakes and cake pops had to be special and different from the ones I typically make, so I decided to merge my go-to strawberry cupcakes with red dragon fruit. I opted to add red dragon fruit to strawberry cupcakes mainly because of the Barbie-like pink color found naturally in the red dragon fruit. I first tested out the combination of dragon fruit and strawberries when developing a dragon fruit raspberry hot chocolate recipe for the colder months. I interchanged the raspberries and strawberries in the hot chocolate recipe as they both offer the same type of sweet and slight tart balance to the hot chocolate. I loved the combination of the slightly sweet dragon fruit paired with the sweet and tart strawberries so much that I extended the flavor profile to my cupcakes and cake pops. Dragon fruit itself has a mild sweetness to it and pairs perfectly with strawberries. When combined, the dragon fruit and strawberry puree gives the cupcakes and frosting an eye-catching pink dessert reminiscent of Barbiecore pink. The bright vibrant pink comes naturally from the red dragon fruit and is enhanced further from the redness of the strawberries. I only buy red dragon fruit occasionally because of how expensive it is. Red dragon fruit is texturally like a kiwi, but is much less sweet with a slight tartness to it. Folded into cupcakes, you get not only a delicious sweet treat, but a truly stunning pink treat. My cupcake recipe yielded exactly twelve cupcakes, which fit perfectly into a 12-cup muffin tin. Half of the cupcakes were served as cupcakes, while the rest were crumbled into a bowl, mixed with some frosting, and turned into cake balls for cake pops. The cake pops were dipped into colored candy melts and left to harden. I only used white, red, yellow, and blue candy melts for the cake pops, mixing some of the colors together as needed to form orange and purple for other color options. To allow the cake pops to harden without disturbance, I used the back of a collapsible silicone colander as a makeshift cake pop holder. The candy-coated cake pops were intended to look like balloons that floated on the cover of the children’s book. The best part about these treats is the stunning Barbie-like pink color comes naturally from the colors of the fruits without the added food coloring. Since Z’s palate is still developing at this age, a mild fruit such as dragon fruit was the perfect fruit for her to try. To round out the rest of our dessert spread, we had to have an equally stunning fruit plate, a must-have in our household. We served it up to Z just so she can get a head start on our family traditions. With the fruit plate, cupcakes, and cake pops all prepared, we just had to snap some photos before digging right into the lovely desserts.  

Read More
Tags: sweet
Comment

A Strawberry Twist on Iconic Black and White Cookies

March 31, 2023

March 31, 2023

I have been working on recreating the iconic black and white cookies over the last couple of months. Black and white cookies are classic New York City treats. When I lived in New York City, I would see them in bakeries throughout Brooklyn and Manhattan. Even so, I’ve only had them occasionally. I still remember my first time taking a bite out of the black and white cookie from Zaro’s Bakery. The soft yet springy cookie topped with a vanilla and chocolate glaze was absolute perfection. It was as if a cookie and a cake had a baby. Whenever I passed by the Amtrak station in Manhattan, I would purposely make a stop at Zaro’s Bakery for one of its black and white cookies. I even served up individually packed versions of black and white cookies from Stern’s Bakery back in 2018 when Kev and I got married in Queens. Needless to say, black and white cookies are as dear to me as some of the more iconic New York City treats. I am, of course, referring to my love of pizza, bagels, and pretzels. Because of how accessible the cookies are, it never even crossed my mind to recreate them. That changed a couple months ago, when I had intense cravings for black and white cookies. While the options around me were sufficient, I really missed the version of black and white cookies from Zaro’s Bakery. I remember distinctly the mega size, the strong vanilla flavor of the cookie base and the balance of chocolate and vanilla glaze coated over the top of the cookie. In reality, the glaze actually coated the bottom of the cookies since they’re flipped over after baking. Either way, the glaze is an essential element of the black and white cookie. I decided it was time to try and recreate a classic black and white cookie. I scoured the web for sources on what actually went into the black and white cookies at Zaro’s Bakery and ended up watching one too many YouTube videos as I gathered information. I then shifted to developing and testing out the cookie recipe. I tested different ratios of ingredients and kept close notes of each iteration. After multiple tries and feedback from Kev and my mom, I finally settled on my preferred version. I found that a combination of cake flour and all-purpose flour yielded the perfect black and white cookies. Cake flour provided the cookies with tenderness, while all-purpose flour provided the cookies with structure. Adding just vanilla extract was not enough to give the cookie the extra oomph it needed and so I took a page from Stern’s Bakery and folded lemon zest into the batter. Other ingredients for the cookies included butter, sugar, honey, kosher salt, egg, sour cream, baking powder, and milk. I learned that many of these ingredients were necessary for helping the cookies stay moist, and they were essential in the version from Zaro’s. A couple tablespoons of pureed strawberries folded into the batter made these cookies exceptional. The addition of pureed strawberries yielded a tangy, sweet cookie with a fresh strawberry flavor. To appease all the cookie lovers in our home, I created three options for the glaze to top the cookies with. The simple glaze consisted of pairing black and white, black and pink, and white and pink for three varieties of cookies. The white part of the cookie came from a simple glaze made with confectioners’ sugar, corn syrup, and vanilla extract. The black part of the cookie came from the addition of cocoa powder. The pink part of the cookie came from the pureed strawberries. I baked and decorated a batch of these cookies for Valentine’s Day last month as a treat for my family. I even reserved a pink and white version as a smash cookie for Z. Z couldn’t quite figure out how to taste the cookie, but she sure did have a good time smashing the cookie with her fingers. Only time will tell if these cookies will be a home run for her. Enjoy these cookies as my nod to New York City with a twist.  

Read More
Tags: sweet
Comment

Lunar New Year + Our Family's Ginger Scallion Steamed Fish

February 25, 2023

February 25, 2023

It has been a while since I last posted. With Z growing up so fast before my very eyes, I haven’t had much time to post a new recipe. In between work and home duties, I’ve been testing out recipes whenever I have time. Last month, we celebrated Z’s first Lunar New Year in Massachusetts as a family. We took her for a stroll through Chinatown in Boston, watched some lion dances from afar, and ate some “lucky” foods. Foods are considered lucky if the name of the food sounds like a lucky word in Chinese. Fish for example sounds like prosperous in Chinese. Thus, we often eat fish during the spring festival. Lunar New Year was one of my favorite holidays growing up. I love everything about the holiday – from the red and gold décor all the way to the endless treats. For years, I’ve been celebrating by making my mom’s tang yuan two ways, a sweet version and a savory version. Each version has its distinct flavors. Every time I take a bite out of a tang yuan, I am transported back to my childhood enjoying these soup circles with my mom. Another family dish I’ve been longing to recreate is my family’s version of ginger scallion steamed fish. This year, Z had her first experience trying our family’s ginger scallion steamed whole fish, a dish my dad and mom have been making for decades. My parents would tag team the preparation of the fish at home and my brothers and I benefited from having a fresh steamed fish every weekend. I didn’t realize how much I missed these home cooked meals until my parents moved in with us temporarily when Z was born. Suddenly, all the foods I loved growing up started showing up in our weekly dinner rotation. Out of all the dishes my dad makes, my favorite will always be his ginger scallion steamed fish. Even Kev, who tends to avoid seafood because of the fishy flavor (as Kev describes it), looks forward to my dad’s ginger scallion steamed fish every week. The magic in the dish lies in the simple sauce my dad prepares to go with the fish. The ingredients are simple. Dark soy sauce, light soy sauce, ginger, scallions, oyster sauce, and peanut oil. The ingredients never change. The ratios do change depending on whether my dad or mom cooks the fish. The way my parents cook fish (and pretty much any other dish) makes it very difficult to capture the exact ratio of ingredients. It is always a sprinkle of this, a dash of that, a drizzle of this, a toss of that. My parents are just used to eyeballing everything they cook. The same goes for the way they cook the ginger scallion steamed fish. When we go to the local Asian market, I watch intently as my dad buys fish. He would browse through the fish tanks before pointing to the exact fish he wants from the tank. It’s usually a fish or two just over a pound in weight. The fishmonger would use a large net to scoop a fresh tilapia out of the tank and show the fish to him. A slight nod of the head indicates the fish has met his needs. I would watch as the fishmonger scrape all the scales off the tilapia. The cleaned fish is rinsed off with a hose and swiftly packed into a plastic bag. The packaged fish is then dropped on a scale, weighed, and priced with a sticker to indicate the final selling price. My dad would always instruct me that fresh is best when it comes to buying fish. Always go for a live fish scooped from a tank. The moment we bring the fish home, my mom gets to work to rinse the fish inside and out. She would make sure the fish is cleared of debris and remaining scales and then pats it dry with a couple sheets of paper towels. The cleaned and prepped fish is then tucked into the refrigerator to be cooked and enjoyed the same night. Weekly ginger scallion steamed fish in our house is as popular as pizza. We never go too long without eating one. It took my parents moving in to stay with us throughout this year for me to rediscover the food memories of this long-lost part of my childhood. For Lunar New Year this year, I decided to team up with my mom to make and photograph our family favorite ginger scallion steamed fish. Watching my dad and mom’s precision with handling the fish for weeks helped me internalize these steps. I look forward to passing this recipe and other family food traditions down to Z.

Read More
Tags: savory
Comment

Holidays in Massachusetts + Matcha Chocolate Bûche de Noël

December 31, 2022

December 31, 2022

As 2022 comes to an end, I have been reflecting on the year and enjoying the happiest of holiday festivities throughout Massachusetts. It has been just over a year since Kev and I moved from Ohio and settled into the burbs of Massachusetts. The holidays this year has been especially exciting since it was Z’s first Christmas. She is in her seventh month now and has reached new developmental milestones. Kev and I have been so amazed by her growth each day and still cannot believe how quickly time has flown by. We were able to spend some much-needed time at home with Z eating tons of food on Thanksgiving and watching Z open presents for the very first time during Christmas. Before we knew it, 2022 was coming to an end. I have been so lucky to be able to spend time with family this holiday season. We cooked up a storm during Thanksgiving and continued cooking and baking straight into Christmas. Christmastime is my favorite time to visit local towns nearby and check out their lights. We brought Z to ZooLights at Stone Zoo in Stoneham, Festival of Trees in Methuen, Winter Lights in North Andover, and even ventured east to Salem for a day trip. There is no joy like watching Z’s face light up in amazement. In between all our winter festivities, I have been hard at work learning some of my mom and dad’s most cherished recipes. My mom makes the absolute best turkey vegetable soup. I started referring to it as mom’s thankful turkey veggie soup. Mom uses a variety of vegetables and cooks it along with turkey legs to yield the perfect blend of east and west flavors. Dad makes a truly stunning ginger scallion steamed whole fish. He always starts with a fresh fish from the fish section of the local Asian grocery store. He would clean it, prep it, and whip everything together in 30 minutes tops. It pairs perfectly with a steaming hot bowl of jasmine rice. Along with these cherished dishes, I also baked up a super simple bûche de Noël weaving in flavors of matcha and chocolate. I started making my version of a bûche de Noël a couple years ago around the holidays as a fun way to celebrate the season. With my parents celebrating the holidays with us this year, I decided to remake my matcha chocolate Yule log cake. This time though, I made it extra festive by decorating the bûche de Noël with holiday lights made of sprinkles. I used two kinds of sprinkles to make the holiday lights, a beautiful shade of blue oblong-shaped sprinkles for the wires and round colorful sprinkles for the light bulbs. The cake itself was easy to make and assemble. All it took was some patience and a light touch to artfully assemble the cake. Just take a look at the visual steps from the recipe I shared in 2021. We served up the matcha chocolate bûche de Noël as a sweet end to a wonderful Christmas dinner. My mom did not even want me to cut into the cake because she thought it was too pretty to eat. While the outside was pretty to look at, the inside also did not disappoint. Z is still small so she isn’t quite ready to enjoy some of the cake, but when next year rolls around, she will be ready to enjoy this sweet dessert along with other festive holiday treats.   

Read More
Tags: sweet, celebrate
Comment
Prev / Next
FBPP2.jpg

Hello! My name is Jia Pan and I love to experiment with food. My site is a collection of recipes and stories chronicling my adventures in the kitchen and around the world.
Read More


Featured Recipes

Featured
Winter Adventures and Maple Blueberry Muffins
Mar 9, 2025
Winter Adventures and Maple Blueberry Muffins
Mar 9, 2025
Mar 9, 2025
Summer and Fall Adventures and Cinnamon Roll Scones
Oct 27, 2024
Summer and Fall Adventures and Cinnamon Roll Scones
Oct 27, 2024
Oct 27, 2024
Spring Celebrations and Wild Blueberry Whoopie Pies
Jun 23, 2024
Spring Celebrations and Wild Blueberry Whoopie Pies
Jun 23, 2024
Jun 23, 2024
Winter Travels and Smoky Cheddar Heart Crackers
Mar 10, 2024
Winter Travels and Smoky Cheddar Heart Crackers
Mar 10, 2024
Mar 10, 2024
Barbecue Chicken Bo Lo Bao and Adventures with Z
Dec 17, 2023
Barbecue Chicken Bo Lo Bao and Adventures with Z
Dec 17, 2023
Dec 17, 2023
Egg Tarts with A Twist and Summer Adventures with Z
Sep 4, 2023
Egg Tarts with A Twist and Summer Adventures with Z
Sep 4, 2023
Sep 4, 2023
Dragon Fruit Strawberry Cupcakes and Z’s First Birthday
May 29, 2023
Dragon Fruit Strawberry Cupcakes and Z’s First Birthday
May 29, 2023
May 29, 2023
A Strawberry Twist on Iconic Black and White Cookies
Mar 31, 2023
A Strawberry Twist on Iconic Black and White Cookies
Mar 31, 2023
Mar 31, 2023
Lunar New Year + Our Family's Ginger Scallion Steamed Fish
Feb 25, 2023
Lunar New Year + Our Family's Ginger Scallion Steamed Fish
Feb 25, 2023
Feb 25, 2023
Holidays in Massachusetts + Matcha Chocolate Bûche de Noël
Dec 31, 2022
Holidays in Massachusetts + Matcha Chocolate Bûche de Noël
Dec 31, 2022
Dec 31, 2022